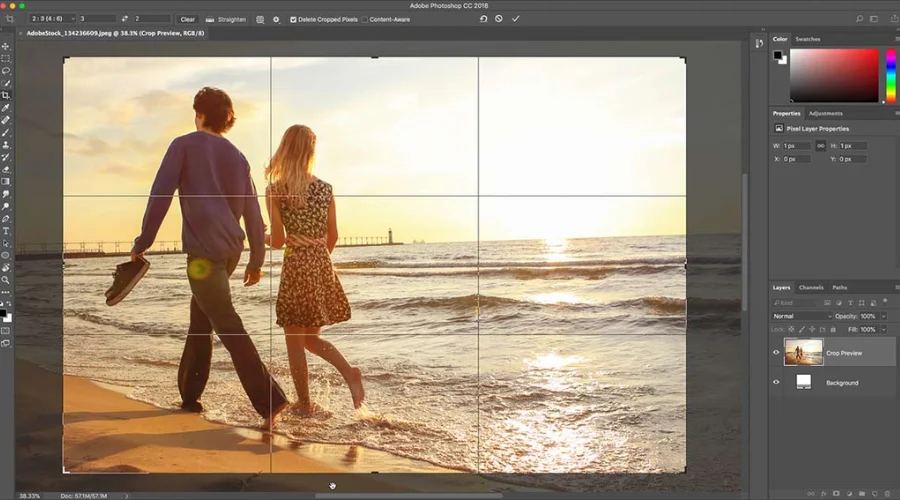
The Crop Tool, often overlooked as a basic functionality, holds immense potential for transforming your photos in Adobe Photoshop. It’s not just about cutting out unwanted elements; it’s about refining composition, emphasising key subjects, and injecting new life into your images. Let’s delve into the creative possibilities and ethical considerations when using this powerful tool:
Functions of Crop Tool in Photoshop
Cropping and Resizing:
The fundamental purpose of this Tool is to crop and resize images. Users can select a specific area of an image, eliminating unwanted portions or adjusting the overall size to meet specific dimensions.
Aspect Ratio Adjustment:
This tool allows users to maintain a specific aspect ratio when cropping. This is crucial for maintaining proportions, especially when preparing images for specific output requirements, such as social media posts or print materials.
Straightening and Rotation:
This tool includes the ability to straighten and rotate images. This feature is handy for correcting crooked horizons or aligning elements within the image to create a visually appealing composition.
Content-Aware Crop:
With the “Content-Aware” option selected, this tool intelligently fills in the gaps created by cropping. This content-aware technology analyses the surrounding pixels and seamlessly extends the background, making it appear as if the image was never cropped.
Custom Shapes and Sizes:
Beyond the traditional rectangular crop, this tool offers various shape options, including elliptical, circular, and custom shapes. This flexibility allows for creative and non-traditional cropping, adding an artistic touch to the composition. Explore Adobe crop tool to get optimum results.
Perspective Correction:
This tool can be used to correct perspective distortion in images. This is particularly useful when photographing buildings or structures from an angle, helping to straighten vertical and horizontal lines.
Rule of Thirds Overlay:
Photoshop provides a “Rule of Thirds” overlay option with the tool. This overlay assists users in adhering to the rule of thirds composition principle, enhancing the overall balance and visual appeal of the image.
Interactive Crop Shield:
This tool includes an interactive crop shield that darkens the areas outside the selected crop. This feature allows users to focus on the specific region they are cropping, aiding in precise adjustments.
Crop and Straighten Photos in Batches:
Users can crop and straighten multiple photos simultaneously using this Tool in Photoshop’s Batch Processing feature. This is a time-saving function for consistent edits across a series of images.
Save and Apply Crop Presets:
Photoshop allows users to save and apply crop presets, streamlining repetitive tasks. This is particularly useful when working on projects with specific size or aspect ratio requirements. Download Adobe’s crop tool today.
How to Work With the Crop Tool in Photoshop Elements.
Working with the Crop Tool in Photoshop Elements is a straightforward process that allows you to precisely adjust the composition of your images. Here’s a step-by-step guide on how to use this tool in Photoshop Elements:
Step 1: Open Your Image
Launch Photoshop Elements and open the image you want to work on.
Step 2: Select the Crop Tool
Locate the tool in the toolbar. It typically looks like a square with diagonal lines. Alternatively, you can press the “C” key on your keyboard to activate this tool.
Step 3: Set Crop Options
In the Options Bar at the top of the screen, you’ll find various options for the Crop Tool. Adjust the following settings as needed:
Aspect Ratio: Choose a specific ratio or select “Unconstrained” for freeform cropping.
Resolution: Set the resolution if you have specific output requirements.
Delete Cropped Pixels: Decide whether to keep or delete the cropped pixels.
Step 4: Drag to Define Crop Area
Click and drag on the image to define the area you want to keep. The selected area will be highlighted, and the rest will be dimmed.
Step 5: Refine Crop Area
Adjust the corners and edges of the crop area by clicking and dragging them. Hold down the Shift key to maintain the aspect ratio, ensuring proportions are preserved.
Step 6: Rotate or Straighten (Optional)
Use the Straighten tool within the tool to straighten horizons. Click on the edge of a line that should be horizontal, and drag along the line.
Step 7: Apply the Crop
Once satisfied with the crop area, press the Enter key or click the checkmark in the Options Bar to apply the crop. If you want to cancel the crop, press the Escape key or click the “Cancel” button.
Step 8: Save or Export
After cropping, save your image or export it in your desired format. If you’re unsure about saving the original file, consider saving a copy to preserve the original image.
Explore Adobe’s website for more information.
Tips:
Rule of Thirds: Consider using the Rule of Thirds overlay, available in the Options Bar, to help guide your composition.
Content-Aware Fill: Photoshop Elements introduced the Content-Aware Fill option with this tool. Enable it to automatically fill in the cropped areas using surrounding content.
Undo/Redo: If you’re not satisfied with the crop, use the Undo (Ctrl+Z or Command+Z) and Redo (Ctrl+Shift+Z or Command+Shift+Z) shortcuts to go back and forth through your edits.
Experiment with Custom Shapes: Photoshop Elements allows you to crop using custom shapes. Click and hold on the Crop Tool icon to access the options, and choose a shape other than the default rectangle.
Conclusion
Using the Crop Tool in Adobe Photoshop Elements gives you the flexibility to enhance your images, improve composition, and focus on specific details. Experiment with different settings to achieve the desired results for your photos. Whether you’re a photography enthusiast, graphic designer, or a casual user, mastering this tool opens up a world of possibilities for refining compositions, perfecting perspectives, and crafting visually compelling narratives.
For more information, visit Findwyse.
FAQs


