


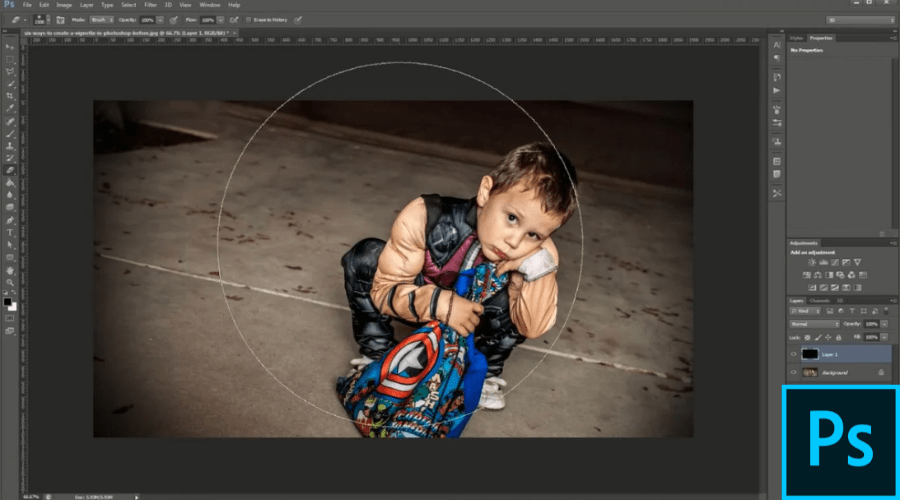
A vignette in Photoshop refers to a technique of strategically shading the edges and corners around a photo’s frame to help draw greater focus on the main subject at the centre. Applying a vignette involves gradually lightening or darkening an image towards the exterior edges. It essentially forms a subtle, circular frame resembling that produced by older camera lenses. Photographers widely use natural or intentional vignetting effects in post-processing to heighten viewer attention on key elements, establish mood through the atmosphere, or simply provide an artistic finishing touch to portrait work. With Photoshop, there is tremendous creative control and finesse for customising the exact shape, size, colour and strength of a photo vignette. Through a range of layer blending techniques and tools like Custom Shapes and Radial Gradient Masks, vignettes can be finely tuned to complement any given image and need.


Key Features of Vignette in Photoshop
- Non-Destructive Workflow Preservation: Vignettes get implemented through separate layers or smart filters that leave originals intact, retaining flexibility. Later tweak opacity, edit colours and refinement stay encouraged without risk. This failsafe workflow fuels creative exploration.
- Total Vignette Shape Authority: Customise vignette boundaries with oval, circular and square presets. Take further control by freehand drawing any shape with brush tools. Conform area overlays to contours of underlying subjects with precision.
- Unrivalled Granular Settings Control: Manipulate every aspect unimaginably – customise the overall size, exact positioning, feathering, opacity and colourization. For colour, sample tones from the photo itself for harmony. Dial-in attributes to rigorously match artistic visions. Visit Adobe’s website today.
- Strategic Blending Mode Choices: Blending modes shift base interactions between vignette layers and background image elements. Multiply intensifies dark tones while the screen brightens. Overlay boosts contrast. Soft light subdues the harshest transitions.
- Feathered Borders Enable Gradual Falloff: Instead of abrupt transitions between shaded and unaltered areas, feathered edges create elegantly diffused boundaries. This natural, smooth falloff sells the effect.
- Jump-Start Projects with Tailored Presets: Hit the ground running by applying beautifully designed pre-made vignettes for portraits, products, landscapes and more context-aware situations. Then customise further.
- Seamless Synergy with Lightroom: Vignettes crafted in Photoshop quickly transfer to Lightroom for integrated workflows. Tweak styling in either ecosystem interchangeably.
Benefits of Using Vignette in Photoshop
- Injection of Artistic Style: Vignettes lend an elegant, gallery-worthy style and intrigue to photographs for exhibitions, vision boarding creative projects and fine art print publications.
- Draws Focus to Subjects: Strategic shading subtly guides attention onto intended subjects while downplaying distracting backgrounds.
-
Sets Conceptual Mood and Emotion: Coloured vignettes help establish compelling atmospheres, themes and feels that complement the subject matter.
- Vintage and Retro Effects: Recreate nostalgic vignetting styles reminiscent of iconic old lenses and film stocks through dedicated filters and presets. Download Adobe now.
- Streamlined Non-Destructive Enhancement: Built-in Camera Raw tools allow quickly boosting photos with vignettes without disrupting existing edits.
- Universal Relevance and Versatility: Vignettes provide relevant improvements for product catalogues, portraits, real estate, events and much more.
How to Use Vignette in Photoshop: Step-by-Step Guide
Step 1 – Import Image as New Layer
Open the desired photo and insert a dedicated layer above the background to allow adjustments.
Step 2 – Enable Smart Filter Flexibility
Right click layer and select “Convert to Smart Object” so vignettes remain editable.
Step 3 – Access Camera Raw Filter
From the menu, choose Filter > Camera Raw Filter to open an integrated editing environment.
Step 4 – Create Custom Vignette
Under “Optics” settings apply a Vignetting slider to introduce shading style and intensity as desired.
Explore Adobe’s website for more information.
Exploring More Vignette Techniques: Vignette in Photoshop Tutorials
1. Achieve Unique Vignette Stylings with Radial Filter
The Radial Filter tool within Camera Raw grants specialised control for crafting distinctive vignette effects. Customise location, shape boundaries, and feathered edges and apply colour tinting for seamless integration with underlying photo tones. Whether enhancing a key subject, establishing seasonal colour themes, or neutralising background distractions – the possibilities stay limitless.
Cater vignette positions off-centre to keep compositions less predictable. Flexibly mask irregular vignette areas using brush tools for perfect tailoring around subjects. By creatively leveraging blending options too, reinvent interactions with foreground elements. Finally, save your signature vignette recipes as presets for consistent access across all projects.
2. Total Vignette Customisation through Layer Masks
For precise finger-tip control over vignette boundaries, layer masks enable “painting in” effects exactly where desired. Use Photoshop’s brush tools supporting pressure sensitivity to gradually brush in shading around key subjects for tack-sharp precision. This tutorial dives into crafting stunning custom vignettes using adjustment layers, masks and leading blend modes like multiply and soft light.
Master dodging and burning specific regions independently while leaving others untouched. Further modification stays non-destructive, retaining edit flexibility. Sample underlying tones using the eye-dropper tool to colour-match vignettes for natural cohesion. Finally, save your setup as an editable preset style for instant recall on all photos. The possibilities are truly endless!
Conclusion
Whether you seek to guide focus onto subjects, incorporate mood-setting atmosphere into scenes, or simply lend images an artistic finishing polish, vignette in Photoshop proves an indispensable creative tool. Adobe Vignette in Photoshop unlocks immense flexibility for crafting the perfect custom vignette to match any photographic context through its extensive shape varieties, granular setting controls, non-destructive integration and creative blend modes.
Vignette in Photoshop -from subtle high key portraits to evocative low key landscapes – gets achieved through the software’s rich feature set. By taking advantage of built-in Camera Raw functionalities, elegantly styled vignettes instantly enhance projects without disrupting existing edits or originals. For today’s photographers and designers alike, vignettes contribute tremendous value on the journey to achieving impactful and aesthetically polished visual compositions. For more information on vignettes in Photoshop, visit Findwyse.


